Categories
Blogging Plugins Search Engine Optimization Wordpress

How to Use Seo Pressor A Best WordPress Plugin

We are using website as a keyword.
Note : whatever keyword you use will be case insensitive. OK.

A post content must contains H1, H2 and H3 Tags in it.

Now this line on this website has H1 tag in it

Now this line has H2 tag in it and our keyword website is also in this line

Now this line has H3 tag in it and here is keyword Website

Another way of writing an effective post.

Seo Pressor Plugin will automatically Bold, italize and underline the keyword we choose. But it will work for only 3 occurrence of that keyword. That word will be shown normal when used fourth time in the same post. It will also add that keyword into the title of the Post.

This website is great. Now i want to see what is this website created for. Can someone tell me why this website is so much important for me.

If you are using the images in the post then it will also add that keyword as alt tag for all images in that post. But this option is not useful for my websites.

A post must have link to other post or pages of your website.
As each post have a keyword so whatever keyword you choose by seo pressor must be used more and more in that post.

I think all above instruction to write an effective post are sufficient.

Some Tips:
Google likes longer than shorter content.
Your keyword density is also an important factor that can influence how you rank.
Your title and heading tags (H1, H2 and H3) are the most important factors that can influence your search engine ranking.

Now the last line of post must also contain the keyword website.

Categories
CakePHP PHP WAMP Server

How to Resolve Errors in CakePHP while installing it on Local Server

How to Resolve Errors in CakePHP

If you are newbie to CakePHP and getting the errors like below while installing CakePHP on Local Server.
“Please change the value of ‘Security.salt’ in app/config/core.php to a salt value specific to your application”
“Please change the value of ‘Security.cipherSeed’ in app/config/core.php to a numeric (digits only) seed value specific to your application”

Then the simple solution to resolve the errors is as follows-:
You just need to do as it says –

1. Edit yourInstallation/app/config/core.php
2. Search for Security.salt and change some random characters (this is so your application doesn’t have the same security seed as a billion other installations, which would be a serious security loophole.
3. Do the same with Security.cipherSeed but use only numbers for this.
4. Save core.php and the issue will be resolved

Categories
C Language Linux Server

How to see output of C program in Linux or UNIX

As like most of the programmer i am new to Linux and i read c programming in college days. At college we used Turbo C compiler under DOS/Windows XP to write and compile C programs.
But in Linux we don’t have that compiler. So today i will tell you simple steps to generate the output of c program in Linux.
First create a simple c program called test.c.

In Linux there is a command gcc (GNU project C and C++ compiler) to compile a program. When you compile a program it generates an executable file called a.out.

Syntax
gcc -o output-file program.c
The above code will create a compile file of the c program.
Suppose your program name is mytest.c
then the command will be
gcc -o mycompilefile mytest.c

Now if you want to to compile the file on linux server then type the command:
gcc mytest.c

If you want to Execute the c program to see the output of tht c program mytest.c
./mycompilefile

Categories
C Language CITI Bank Payment Gateway Linux Server Payment Gateway Integration PHP

How to Integrate CITI Bank Emi Payment Gateway in Linux Server

Today i am writing another simple steps to integrate the CITI Bank PG for advanced PHP Programmer.
The following steps will only work on Linux server as the linux server already have shell scripting enabled. I did not tried the below process on Windows.
I suggest you to first read the docs files sent by Citi Bank team. Although they are having a less technical guys sitting in there team and they can’t provide the program written in PHP not in other languages. They have a simple C program and nothing else. Don’t waste your time in calling them again and again and the output will be negative.

Step 1. Create a folder named citibank (name can be different as per your choice) on your Linux server. The location would be like this “/var/www/html/citibank”
Step 2. Copy the checksum.so.1 and prog.c or santest.c C program file provided by Citi Bank PG Support team in the folder.
Step 3. Then create a PHP program generate_checksum.php
<?php
shell_exec(‘gcc -rdynamic -o prog3 prog3.c -ldl’); // this shell command will create a prog3 compile file that will help to generate the checksum
?>
The above program will create the prog3 executable compile file on your server.
(* As the file will be created in the same citibank directory so the directory must have 0777 read write permission.)
If the executable compile file is not creating then there must be some problem and you can not proceed further without this file. Contact the Network Guy in your team or read the error log to resolve the issue.

Note: If you want to know that shell scripting is enabled on your Linux server is not then run the following php code.
<?php $output = shell_exec(‘ls -lart’); ?>
If the PHP Program shows some output then the shell scripting is enabled on your server.
If not then refer the log file at location “/var/log/httpd/error_log” (As i am using the Apache Server)

Step 4. If everything written above is working in a correct way then you may proceed further with the following PHP program.
Simple create a file form.php on your server and run the program.
<?php
function getChecksum($string ,$key)
{
$checksum_output = shell_exec(“./prog3 $string $key”);
$checksum_output = explode(‘=’,$checksum_output,2);
$checksum = $checksum_output[1];
$generatedChecksum = trim($checksum);
return $generatedChecksum;
}
$checksum = getChecksum(‘CITI’, ‘9310341016vasim’); // 4 digit and 12 digit
$return_url =’http://www.YourWebsite.com/anyreturnfile.php’;
$d_m_y_his = gmdate(‘dmYhis’); // 182652
$merchant_code = ‘44350912’;
$order_no = ‘20811332’; // 20662730
$trace_no = ‘662730’; // 662730
$amount = ‘200.0’;
?>
<FORM name=”frm” action=”https://www.test.citibank.co.in/servlets/TransReq?” method=”post” >
<INPUT type=”text” size=”200″ NAME=”MalltoCiti” VALUE=”0100|<?php echo $return_url; ?>|1|<?php echo $checksum; ?>|<?php echo $d_m_y_his; ?>|<?php echo $merchant_code; ?>|<?php echo $order_no; ?>|<?php echo $trace_no; ?>|<?php echo $amount; ?>|”>
<input type=”submit” NAME=”Submit” value=”Pay Now”>
</form>

The C Program that will be used by above php program is

#include
#include
#include
#include

int main(int argc, char *argv[] )
{
void *handle;
char temp1[strlen(argv[1])+1];
char temp2[strlen(argv[2])+1];
strncpy(temp1,argv[1],strlen(argv[1]));
temp1[strlen(argv[1])+1] = ‘\0’;
strncpy(temp2,argv[2],strlen(argv[2]));
temp2[strlen(argv[2])+1] = ‘\0’;

char *str;

char* (*func)(char*,char*);
handle=dlopen(“/var/www/html/non-deploy/checksum.so.1″,RTLD_LAZY);
func=(char* (*)(char*,char*))dlsym(handle,”Transpo”) ;
str=(char*)malloc(sizeof(char) * 20);
str=(char *)((*func)(temp1,temp2));
printf(“STR = %s \n”, str);
}

According to me everything will work fine and the Citibank url https://www.test.citibank.co.in/servlets/TransReq? will open successfully.
If there is something that you did not understand then you can Conact me.
Cheers and have fun!

Categories
PHP RSS Feeds

How to Display RSS Feeds from other websites in your PHP Page

RSS stands for Really Simple Syndication and Atom are two famous feed format.

If you open any RSS Feed page, first line starts with < ?xml … ?> and then and at the end .
So anything inside and is feed data.
Every content is placed under .
So all we need to do is read information inside and display it.

Here is a sample program that does it.

/* Our Code Starts Here */

//Enter the Feed url as parameter to function

$xml = simplexml_load_file(”http://www.vaseemansari.com/blog/feed”);

//To check if the read document is a rss feed

if($xml->channel->item)
{
$contents = $xml->channel->item;
foreach($contents as $content)
{
echo $content->title;
echo $content->description;
}
}
else
{
echo “Invalid RSS Format”;
}

/* Our Code Ends Here */

I will provide you the complete zip file of the php code very soon. Please be in touch and keep on reading.

Categories
ICICI EMI Payment Gateway JavaBridge Payment Gateway Integration Tomcat Server

How to install JavaBridge and integrate ICICI Payment Gateway

Step by step Procedure to create JavaBridge on Linux and then Integrating ICICI Payment Gateway

I have talked a lot to the ICICI Payment gateway guys in Mumbai. I sent so many mails and followed the complete useless procedure sent by them. Initially I asked for instructions to create JavaBridge in PHP+MySql+Apache+Linux(CentOs) but they were failed to sent me the usefull instructions. As they sent me instructions to create javabridge in Tomcat server so finally we also decided to create the JavaBridge in tomcat server. Then I with my TL (Mr. Anuj Shukla) sat together and worked on the instructions provided by Diadem Tech Weblogs. The instructions provided by him for installing the JavaBridge for Tomcat server + Linux were really helpful.

So here are few necessary and useful step by step instructions to install JavaBridge.

  1. Download the file “php-java-bridge_6.2.1_documentation.zip” from this link. This link will give you JavaBridge.war and documentation folder once you extract this downloaded file. You can extract using the following Linux command jar xvf JavaBridge.war Copy this JavaBridge.war file to your online Linux server at this location /var/lib/tomcat5/webapps/. We are assuming that you or your technical team already installed the tomcat server on your Linux Operating System.
  2. Then upload the JavaBridge.jar and php-servlet.jar, located under JavaBridge/WEB-INF/lib directory to this location of your server /var/lib/tomcat5/shared/lib/
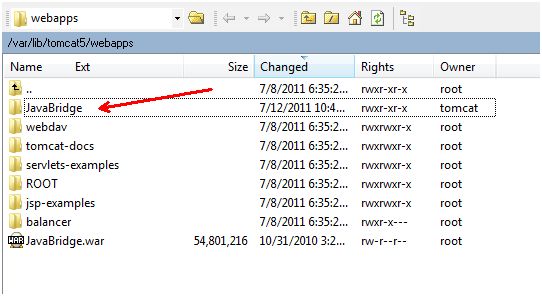
  3. Once you upload the war file then you must restart the Linux server with the following command. Once you run the command using putty then a JavaBridge folder will be automatically created on the server. Use this Linux command to start the server/etc/init.d/tomcat5 restart (Once you restart the tomcat server and JavaBridge folder is automatically created this means the JavaBridge is installed properly)
  4. Then login to your ICICI merchant admin panel with required login details and download the key file and SFA files (php.zip) and extract it on your computer. The file will give you 2 zip files named as SFA_Dependencies.zip and SFAClient.zip and a file PHP Sfa Guide.pdf
    1. The PHP SFA comes bundled as 2 zip files –

    1.SFAClient.zip – This zip file contains the components, which provide the core SFA functionality and test pages

    2.SFA_Dependencies.zip – This zip file contains the components that are required for the SFA to function

    The installation process for SFA_Dependencies.zip is as follows –

    The zip file SFA_Dependencies.zip has the following files

    1)cryptix32.jar – Required by SFA to encrypt the data sent to the ePG

    2)jcert.jar – Required to establish the SSL connection with ePG

    3)jnet.jar – Required to establish the SSL connection with ePG

    4)jsse.jar – Required to establish the SSL connection with ePG

    5)Servlet.jar – HTTP Request/Response handling

    6)Sfa.jar – SFA Java library

1.      Now we need sfa.jar file that can be found under “SFA_Dependencies.zip” file so you need to extract SFA_Dependencies.zip to get the sfa.jar and edit the sfa.properties file with the following entries:


motoURL=https://payseal.icicibank.com/mpi/Moto.jsp

sslURL=https://payseal.icicibank.com/mpi/Ssl.jsp

verbose=true

Key.Directory=/var/lib/tomcat5/webapps/JavaBridge/key/

OS.Type=UNIX

epgURL=https://payseal.icicibank.com/mpi/PGServSFA

traceLog=/var/log/tomcat5


2.      Once you edit the sfa.properties file then put the file in sfa.jar file. You can use jar command Jar -xvf sfa.jar to extract file and once you successfully edited the sfa.properties then you can use jar command Jar -cvf sfa.jar com sfa.properties to zip the file.


3.      Then copy all the 6 jar files (that were extracted from SFA_Dependencies.zip file) including the edited sfa.jar file in /var/lib/tomcat5/common/lib/ folder

JAR Files to copy: cryptix32.jar, jcert.jar, jnet.jar, jsse.jar, servlet.jar, sfa.jar


4.      Then copy the key folder with key files in it to /var/lib/tomcat5/webapps/JavaBridge/ and give it a 777 read and write permission as shown in following image